Rex On Rails - Part Two Installing and testing a Whiteline 22mm adjustable rear swaybar - the biggest bang-for-buck handling improvement you can make. Words by Michael Knowling, Pix by Michael Knowling and Mellissa Taylor
http://www.autospeed.com/cms/A_1690/printArticle.html
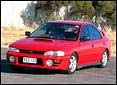
In Part One of Rex on Rails we looked at the standard suspension and handling of the GC8 Subaru Impreza WRX and made some effective no/low buck improvements - we optimised tyre pressures and dialled up a performance wheel alignment. These changes gave a considerable improvement - a more active rear-end, greater front-end grip
during cornering and dramatically less tyre wear on the outside edge of the front tyres (which, in itself, can save big dollars).
In Part Two of this series we'l begin changing the factory suspension hardware, looking at the reasons for adding a
swaybar, costs, installation and of course the results.
Where To Begin?
While some people argue that aftermarket springs and dampers are required for any serious handling upgrade, one
of the most cost effective changes to a WRX is increased rear roll stiffness - and that means upgrading the rear swaybar.
A swaybar is a simple torsion bar that opposes body rol by linking the suspension movement of the wheels at one
end of the vehicle. In the case of a WRX, the handling advantage gained from a stiffer rear swaybar can be broken into three parts. First, the stiffer swaybar increases the load on the outside rear tyre during cornering. This reduces the adhesion of that particular tyre so the rear-end of the vehicle becomes more unstable, offsetting some of the
WRX's inherent understeer. Second - assuming a reasonable amount of chassis rigidity - a stiffer rear 'bar will also result in slightly less roll at the front of the vehicle. This better distributes the cornering loads on the front tyres,
partially relieving the tortured outside front tyre. The third benefit of increased rear roll stiffness is more consistent alignment angles due to reduced suspension travel.
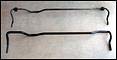
So what upgrade rear swaybars are available in the aftermarket? Well, the product that caught our eye was the 22mm adjustable rear swaybar from Whiteline Suspension (part number BSR20XZ). With three different anti-roll
stiffness settings to chose from, this 'bar has the advantage of being configurable to suit driving style, environment and the mechanical set-up of the car. The product has established a very good reputation on worldwide Subaru
forums and with a new RRP of $160 (including GST) it's a relatively inexpensive proposition. Given the number of people into tweaking their Subies, it's also quite common to find second-hand swaybars popping up for sale. We
picked up a used Whiteline 22mm adjustable rear swaybar - complete with optional heavy-duty body mounts - for just $170. Bargain!
Part of a Package?
It's no coincidence that the most cost effective handling enhancement is part of a Handling Pack offered by Whiteline Suspension. The 'no fluff' Handling Pack comprises the aforementioned 22mm adjustable rear swaybar, ALK (anti-lift
kit), a 22mm non-adjustable front swaybar and a camber kit for the rear wheels. Note that the complete Whiteline Handling Pack retails for $649 including GST - considerably cheaper than purchasing each of the components
Planning to go beyond fitment of just a rear swaybar, we though it logical to follow in the footsteps of the Whiteline
Handling Pack. The team at Whiteline have certainly put in extensive road and track testing and it'd be plain silly for us to ignore it. As a result, our Rex on Rails series will cover each component of the Handling Pack incrementally - in
this story we'll fit the rear swaybar, the next will be on the ALK and following that will be the front swaybar and rear camber kit.
Fitting the Whiteline 22mm Adjustable Rear Swaybar
The Whiteline adjustable rear swaybar can be installed at home within a couple of hours.
Note that fitment of the new 'bar requires the vehicle be left at its normal ride height - do not raise the wheels from the ground.
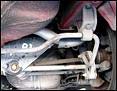
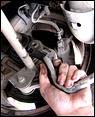
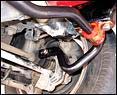
First, remove the 14mm nut and bolt that attaches each end of the rear swaybar to the plastic swaybar links. Allow
Next, the two D-shape brackets that secure the centre section of the swaybar to the body need to be removed. Each of the D-brackets are attached to the vehicle with a single 12mm bolt and a tongue fitting; remove the bolt and manoeuvre the bracket from the vehicle.
With the four swaybar attachment points disconnected, the factory 'bar can now be withdrawn from the vehicle. This
http://www.autospeed.com/cms/A_1690/printArticle.html
is a slightly awkward job, especially if a large diameter exhaust is fitted - where necessary, you may need to temporarily drop the rear section of exhaust.
With the stockie swaybar removed the job is already half done.
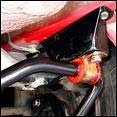
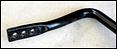
Next we need to manoeuvre the new 22mm swaybar into position; note that end of the 'bar with the U-shape bend goes on the driver's side of the vehicle. Before we begin spinning any spanners again, however, we need to prepare
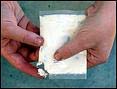
Supplied with the swaybar are a new pair of low-compliance D-bushes and a satchel of white lithium grease. Apply
the grease evenly over the new bushes' inner and outer surfaces - the parts that will come in contact with the swaybar and D-brackets respectively.
Note that the factory D-brackets are retained for use with the new rear swaybar. Thoroughly clean the inside surface
of the D-brackets and it doesn't hurt to smear a bit of grease inside as well; the more grease surrounding the bushes the less chance they'll squeak.
With the new bushes thoroughly greased up, push them onto the appropriate position along the length of the swaybar; look at the wear marks on the factory swaybar as a guide. Ensure that the flat side of the bush faces
upward so it will fit flush against the body once attached.
With the greased bushes now in position on the 'bar, the next task is to push the D-brackets over the bush and fasten them into their threaded swaybar mounts. Only finger-tighten these bolts at first, making sure that the bush is
compressing appropriately as you wind it in. Assuming everything looks fine, the next step is to finger-tighten the ends of the new swaybar to the factory end-links. As a safety precaution until you become accustomed to the handling effect of the new swaybar, we'd avoid the firmest anti-rol setting - the holes furthest from the ends of the
'bar. In the first instance, we'd advise setting the 'bar to its softest or medium rate - these are the centre and end holes respectively. Make sure that you pass the bolt through from the outside and wind the nut in from the inside.
Take a look along the length of the swaybar to make sure nothing is fouling and that the new bushes aren't distorted, then you can tighten the 12mm D-bracket bolts and the 14mm end link attachments. The official Subaru service manual says to tighten these to 18 - 31Nm and 14 - 25Nm respectively.
What WE Did!
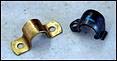
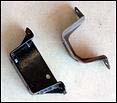
In addition to the Whiteline 22mm adjustable swaybar, we also installed the heavy-duty swaybar mounts that we
received as part of our second-hand deal. In the case of the Impreza, swaybar mounts are used to attach the swaybar D-bracket to the body. So why replace the factory mounts, you ask? Well, apparently the factory items can break when you dial up a heap of rear roll stiffness - the Whiteline heavy-duty swaybar mounts are simply a stronger
version. Note that there may be a small handling advantage associated with the heavy-duty mounts, but its main purpose is to add durability. The RRP (new) for the heavy-duty swaybar mounts is $125 including GST.
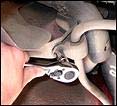
To fit both the heavy-duty mounts and the 22mm rear swaybar, you'll first need to remove the factory 'bar as
described above. Next, remove the 12mm bolts that secure the factory swaybar mounts to the body and withdraw the mounts from the vehicle; the only hassle is one of the bolts securing the driver's side mount is awkward to access.
Take a look at the Whiteline mounts and you'll notice they're stamped L and R - one side is dedicated to the left side
of the vehicle, and the other is dedicated to the right. Align the appropriate mount with the threaded holes in the body (as used by the original mounts) and fasten them using the factory 12mm bolts. Oh, and it's a good idea to wipe
clean the mating surfaces before they're united.
Note that fitment of the heavy-duty swaybar mounts necessitates a new pair of Whiteline D-brackets (which incorporate a bolt on both ends rather than a bolt and a tongue fitting). The D-bushes are also different when you're using a heavy-duty swaybar mount. Once the bushes are greased and pushed onto the swaybar, fasten the new D-
bracket to the Whiteline swaybar mount using the supplied 16mm bolts. From this point you can proceed fit the Whiteline 'bar as described above.
Finally, because we purchased our swaybar second-hand, we didn't score a satchel of Whiteline's bush grease. Any
lithium based or synthetic grease will do the job, however - we used BP Energrease LC2. You may also notice that our swaybar is black in colour - we had it powder coated that way so it's 'invisible' from the rear. The standard Whiteline swaybar colour is metallic silver (replacing the earlier light blue shade).
http://www.autospeed.com/cms/A_1690/printArticle.html
On-Road Results
The adjustable 22mm rear swaybar absolutely transformed the WRX's handling - this really is the biggest bang-for-buck handling mod you can make!
Mid-corner is where the new 'bar makes its biggest difference. The WRX is now much more obedient during its approach to the apex of a corner - you no longer have to combat understeer and more understeer. The front-end
points much closer to the steered angle and the chassis remains more neutral - especially through tight corners that would otherwise have the Rex plough understeering. From the driver's seat you can really feel the outside rear tyre
being loaded and, relatively speaking, the outside front tyre is under less stress. For the first time you can hear the rear tyres yowling through a corner, not just the fronts; this is a good indication that the cornering loads are now being evenly distributed through the front and rear outside tyres. Tyre wear, as a result, will be less focussed to the
The new swaybar improves turn-in, though the difference is not as tremendous as the middle stages of the corner. If you come into a corner too fast or your steering input is too rough, there is certainly less tendency for the nose to
plough ahead. It will understeer in these situations, but not terminally. Given a smoother steering approach, the rear swaybar won't make a huge difference to turn-in.
Corner exit is slightly improved thanks to a more accurate approach to the apex that effectively 'opens out' the exit line. Previously, it was easy to understeer wide of the apex and be forced to tighten you exit line; with the Whiteline
swaybar, you can more accurately follow the optimal line. If you apply power while there is significant steering lock wound on you'll get power understeer - though it doesn't feel as pronounced as previously.
And how reactive is the car to mid-corner throttle offs?
Well - first - we must emphasise there's now much less requirement to lift off the throttle in order to get the front-end to tuck in. With the chassis more balanced, there are only few occasions (such as when negotiating a tight round-
about) when a slight mid-corner lift-off will be of benefit. Depending on entry speed and your steering input, a sharp throttle-off can cause a considerable oversteer action. Other than looking spectacular we're not sure if this is a great
characteristic, but it shows the car now has much more balance - you're not limited to just understeer.
The three different swaybar adjustments make a considerable difference to the handling attitude of the car. The softest roll setting stil gives all of the abovementioned but is quite benign in its transition to lift-off oversteer. In the other extreme, the firmest setting is perhaps a bit much with otherwise stock suspension and road-spec tyres. Be
aware that the tail can step out quite a long way - and very rapidly - when the car is unsettled by factors such as road camber changes or loose gravel atop of the bitumen. The firmest setting is, however, probably ideal for track use.
And now we arrive at the middle setting - the setting we are currently most content with for everyday street duties. The centre swaybar hole provides much improved mid-corner attitude and its lift-of oversteer characteristic is manageable in everyday conditions - in dry weather conditions, anyhow.
Given the adjustability of the rear swaybar, you may kind it necessary to revise the rear tyre pressures that were
deemed optimal with the standard suspension set-up. We were quite happy maintaining our 32 psi rear inflation pressure, however.
Note that we'll give you a long-term update on our suspension upgrades further down the track. This wil include
handling characteristics in wet weather conditions, whether or not the bushes started squeaking, tyre wear and more. After about 1000 kilometres of driving with the Whiteline swaybar, we haven't yet heard any bush squeaking.
So with just the adjustable 22mm rear swaybar, a performance alignment and optimised tyre pressures we've already fixed much of the WRX's handling problem. How will the ALK, stiffer front swaybar and rear camber kit perform? Stay
Contact: Whiteline Suspension +61 2 9603 0111
Copyright 1998-2003 AutoWeb Pty Limited &
Web Publications Pty Ltd All Rights Reserved
http://www.autospeed.com/cms/A_1690/printArticle.html
No.13, Kong 9th Road, 2nd Industrial Park, Linkou District, New Taipei City, Taiwan, R.O.C. TEL: 886-2-2601-0385 FAX: 886-2-2601-0460 MATERIAL AND SAFETY DATA SHEET 1. MANUFACTURER INFORMATION Mobile Energy Technology Co., Ltd. No.13, Kong 9th Road, 2nd Industrial Park, Linkou District, New Taipei City, Taiwan, R.O.C. TEL: 886-2-2601-0385 FAX: 886-2-2601-046 Date of issue: February
CUADRO DE PLAZAS DOCENTES PARA CONTRADO GOBIERNO REGIONAL DE AREQUIPA GERENCIA REGIONAL DE EDUCACIÓN Institución Educativa DRE/UGEL Nivel y Modalidad Especialidad Código Plaza Motivo de Vacancia Educativa Distrito Provincia Característica 2 1182119435C0 1182119435C9 1182119435C8 1182119445C3 1132119315C2 CUADRO DE PLAZAS DOCENTES PARA
 Rex On Rails - Part Two